Archives

Force reset / Factory reset

Force reset

When the product does not work correctly or an abnormal action occurs, you can reset it by removing the battery.
After that, reinsert the battery and press the function button for 3 seconds to restart.

Factory reset

  1. Press and hold the function button 3 seconds to turn REC-1 on.
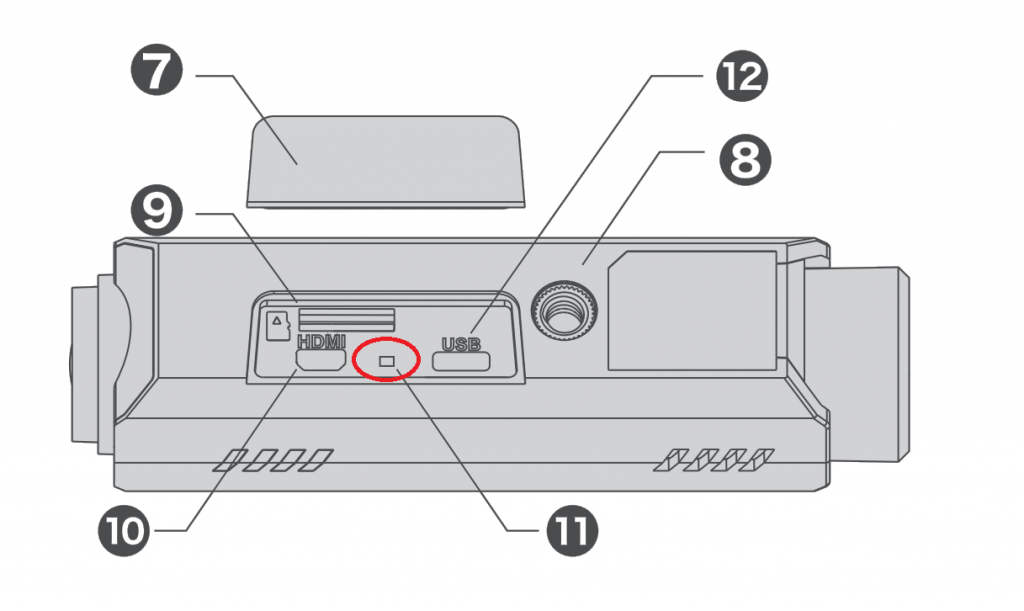
  2. Firmly press the reset button (11 in the following image) for 5 seconds using a thin, stiff object of less than 2mm in diameter.
    **Do not use a needle or other sharp metal objects to press the button. Doing so may cause a malfunction or an electrical short circuit.
  3. Factory reset is complete when a beep sounds.

Updates

*See this link for LOG-1 updates.

Firmware

  • ver 1.1.0 (2017.07.28)
    • Added function to change GPS update interval.
    • Fixed minor bugs.

iOS app

  • ver 1.4.0 (2017.07.28)
    • Added function to change GPS update interval.
    • Added a message to inform that live preview does not work when you select “Still” for “Time Lapse Type”.
    • Added a message to inform that date stamp and digital zoom functions cannot be used at the same time.
    • Added function to display a notification when there is a new firmware update.

Android app

  • ver 1.0.12 (2017.07.28)
    • Added function to change GPS update interval.
    • Added a message to inform that live preview does not work when you select “Still” for “Time Lapse Type”.
    • Added a message to inform that date stamp and digital zoom functions cannot be used at the same time.
    • Added function to display a notification when there is a new firmware update.
    • Fixed problem where resolution settings may not update.
  • ver 1.0.3 (2017.06.06)
    • Changed settings menu UI.
    • Changed error message when SD card is not inserted.
    • Added sound effect when a photo is taken.
    • Change REC button icon when a time-lapse video is being recorded.
    • Changed message content in REC-1 App.

REC-1 app details

Connection screen

① Instructions
② Camera register button / Camera select button
Up to three cameras can be registered in the REC-1 app.
Tap [Add New Camera] to register a new camera.
After registration the name of REC-1 will be shown.
③ Thumbnail
A thumbnail is shown when REC-1 is registered.

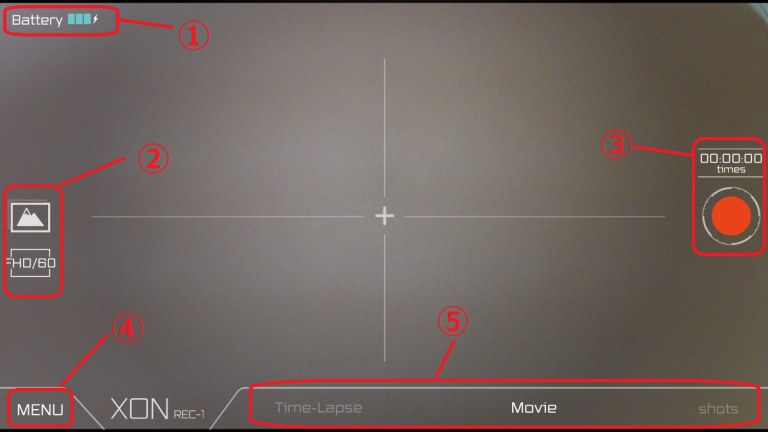
Main screen

① Battery icon
Shows the battery status of REC-1.

② Quick settings
Album and frequently used settings are available here.
Icons will change depend on modes.
In Movie mode and Time-Lapse mode, there are album and resolution options.
Self-timer, album and resolution options are available in Shots mode.

③ REC button
Press this button to take a video or a photo.

④ Menu button
Open the settings menu.
Contents will change depending on the current mode.

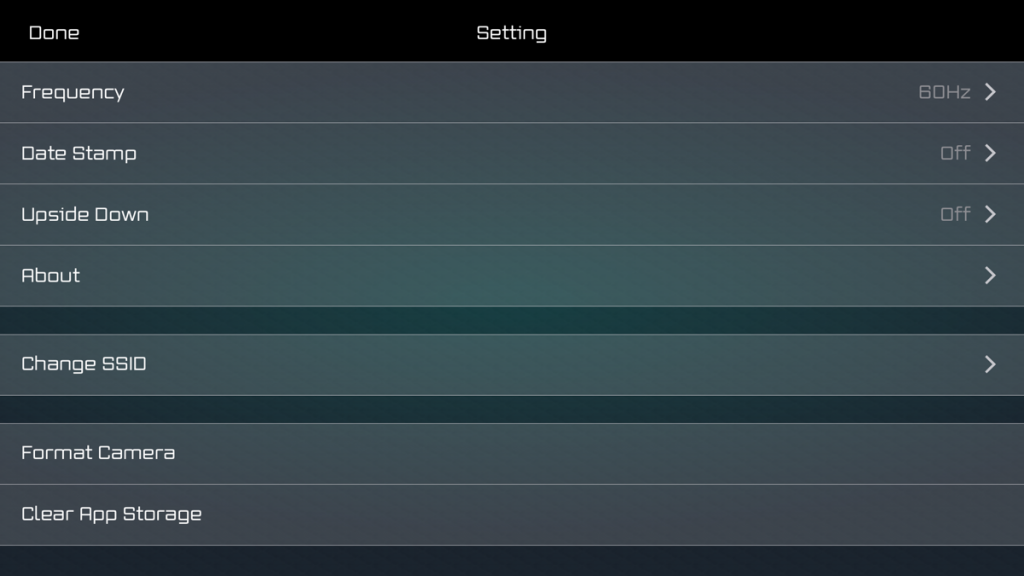
Settings screen

Contents of the settings page will change depending on the current mode.

  • Frequency
    The frequency setting can improve flickering caused by light source frequency.
    Flickering could be reduced if the setting matches the local lighting frequency.
  • Continuous Shooting
    Set how many photos the camera takes when single tapping the REC button.
    REC-1 takes 1 photo when set to “OFF”, 3 with “3 photos”, 5 with “5 Photos” and 10 with “10 photos”
  • Date Stamp
    The date or date and time will be overlaid onto video or photos when “Date” or “Date & Time” is selected.
  • Upside Down
    The image that REC-1 takes will be upside-down when “ON” is selected.
  • About
    Displays the app version, firmware version and product name.
  • Change SSID
    Change SSID and passphrase.
  • Format Camera
    Initialize the SD card.
    All data on the SD card will be deleted.
  • Clear App Storage
    Delete the cache which is used when a smart phone downloads video and photos from REC-1.
  • Time Lapse Type
    Change the file format of time-lapse mode.
    The file will be saved as an image (.jpg) when “Still” is selected.
    On the other hand, video file (.mp4) will be used when “Video” is selected.
  • Time Lapse Interval
    Set an interval time for time-lapse mode.


Connect REC-1 to app

1.Turn REC-1 on

Press the function button for 3 seconds, when powering on the function
LED will light up blue-green and a beep will sound.

2. Turn Wi-Fi on

  1. Check REC-1 is in standby mode. The function LED will blink blue-green once per 2 seconds.
  2. Press the function button for 2 seconds. A beep will sound and the function LED will blink blue-green twice per 2 seconds when REC-1 Wi-Fi is available.

3.Connect REC-1 to app

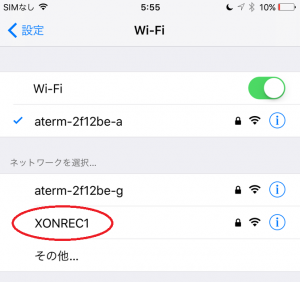
  1. Find the SSID of REC-1 on your smartphone’s Wi-Fi settings menu.
  2. Tap the REC-1 SSID and connect.
    The default pass phrase is “1234567890”.
  3. Launch the REC-1 app.
    See this link for app installation instructions.
  4. Tap [Add new camera].
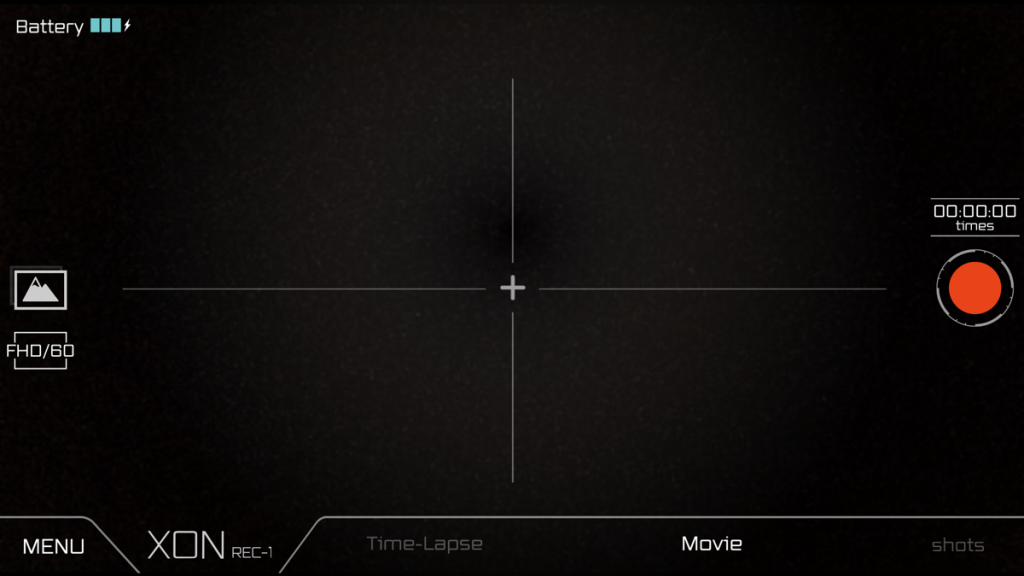
  5. Connection is complete when the app shows the image below.


LED status

The status of REC-1 is indicated by LED color and lighting patterns.
REC-1 has a battery LED and a function LED.
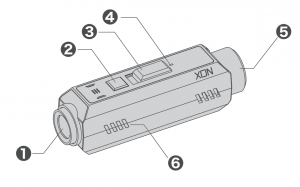
No.4 is the battery LED and No.6 is the function LED.

Battery LED status

When powered on press the function button, the battery LED will light up for 1 second and the light color indicates the charge remaining.

Function LED status

Normal mode

Status Pattern
Start-up Blue-green for about 3 seconds
Standby Blue-green blinking once per 2 seconds.
REC start Red blinking once per 2 seconds.

When Wi-Fi is on

Status  Pattern
Standby Blue-green blinking twice per 2 seconds.
REC start Red blinking twice per 2 seconds.

Other

Status Pattern
Error Blinking red
Firmware update Blinking alternately between blue-green and red

Basic usage

Power on / Power off

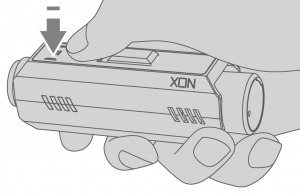
Power on

Press the function button for 3 seconds, when powering on the function
LED will light up blue-green and a beep will sound.

Power off

Press the function button for 5 seconds or more. A beep will sound after
pressing for 2 seconds, continue pressing and the function LED and power
will turn off.
REC start / stop

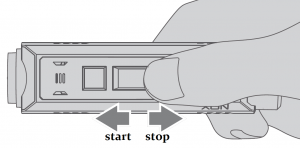
REC start

Slide the recording slide switch forward to start recording, the function LED
will turn red when recording.

  • Recording can be started by sliding the slide switch forward from a power off state.
  • The built-in GPS starts recording simultaneously when recording starts.
  • When using GPS for the first time or after not having used for an extended period, leave for about 5 minutes after turning on the power to establish current location. After 5 minutes you may then begin recording.

REC stop

Slide the recording slide switch backwards to stop recording.
After recording stops, the function LED will return to blue-green lighting.
Wi-Fi on / off

REC-1 can function as an access point.
Connecting to REC-1 via Wi-Fi is needed to use the REC-1 app.

Wi-Fi on

  1. Check REC-1 is in standby mode. The function LED will blink blue-green once per 2 seconds.
  2. Press the function button for 2 seconds. A beep will sound and the function LED will blink blue-green twice per 2 seconds when REC-1 Wi-Fi is available.

Wi-Fi off

Press the function button for 2 seconds or leave REC-1 for a minute without connecting the REC-1 app.

Install the REC-1 App

REC-1 can record video without the app.

However, using the REC-1 App you will be able to take photos, take time-lapse video and access other features.

iOS

Download the app here.
*iOS 9.0 or later required

Android

Download the app here.
*Android 3.1 or later required.

Insert SD card

Preparation

  • A micro SD card is not included, please use your own micro SD card.
    Check this link for more details of SD card.
  • Cerevo recommends you format the SD card before using.
    It may not work correctly if it is not formatted.
    See this link for how to format the SD card.

How to insert and remove micro SD card

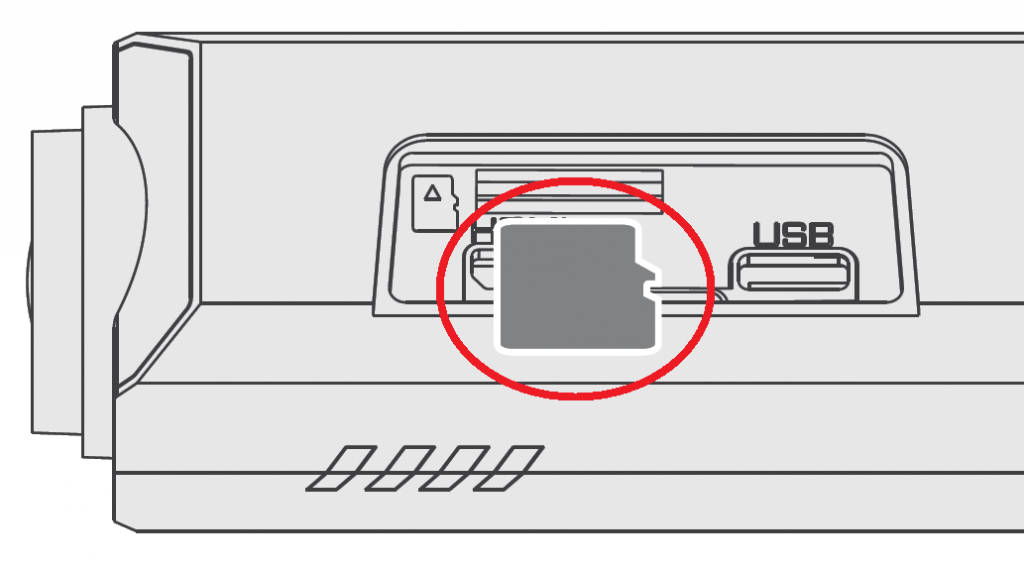
  • Insert a commercially available micro SD card in the direction shown in the illustration. If inserted correctly, a small click will be heard.
  • To remove the SD card, first confirm that the device is not recording and turn off the power, push it gently with your finger and then pull it out of the slot.


Battery charging

Preparation

  • A PC or USB AC adapter (5V / 1.5A) is required to charge REC-1.

How to charge

  1. Open the slot cover.
  2. Insert the USB cable, connect it to a PC or AC adapter (not included).
  3. While charging the battery LED will light up red, when changing is complete it turns off.

How to check remaining battery power

When powered on press the function button, the battery LED will light up for 1 second and the light color indicates the charge remaining.

Battery installation

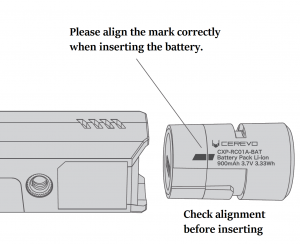
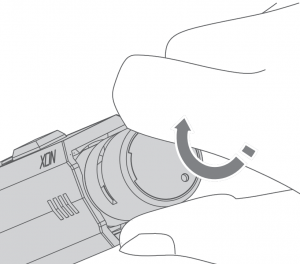
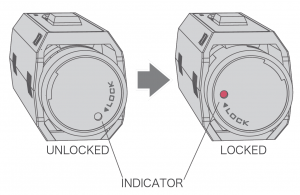
  1. Make sure the alignment mark is visible as shown when the battery is inserted.
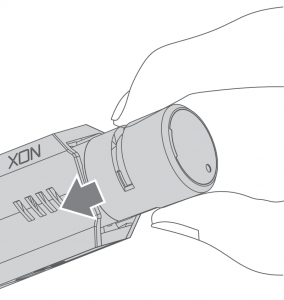
  2. After inserting, twist the battery clockwise and turn until the indicator hole on the back of the battery turns red.
    If the battery is not securely locked, the waterproof function may not work and the battery may fall off during use.