XON LOG-1 Utility
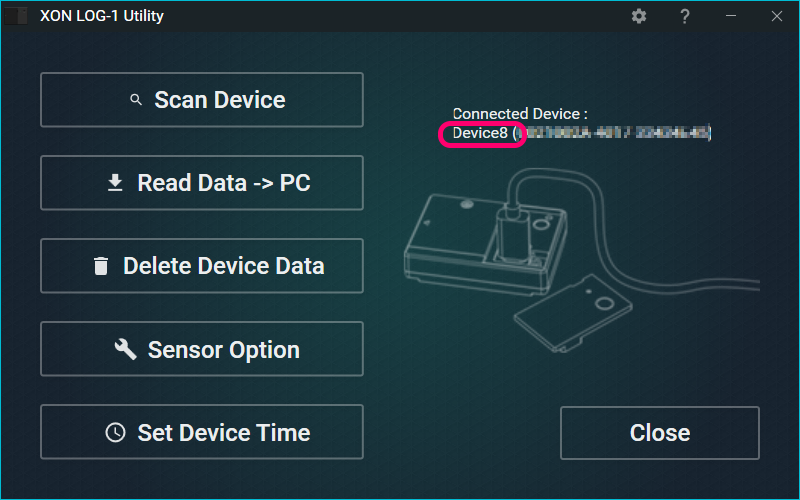
This utility controls LOG-1 data reading, deletion and performing device settings.
Preparation
- Remove the rubber cap and connect the body to a PC with a USB cable.
- Start the XON LOG-1 Utility.
Screen details
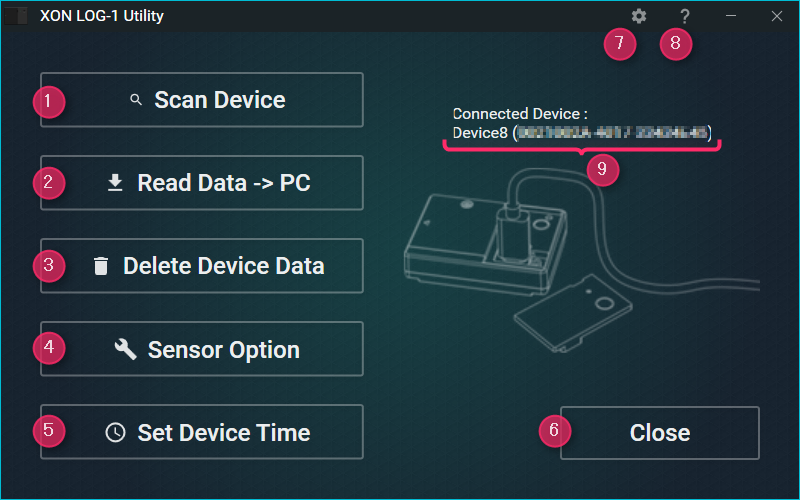
①Scan Device
Search for connected LOG-1 device.
* You can detect only one device at a time.
②Read Data -> PC
Reads the sensor data saved on the device and saves to the PC.
Saved data is formatted as a comma-delimited text file.
*If you change the file name or file contents, XON LOG-1 Overlay Movie Exporter may be unable to use the file.
③Delete Device Data
All data contained on the LOG-1 will be erased.
*Once erased, data can not be recovered.
④Sensor Option
Sensor settings (see below “Sensor Options screen”)
⑤Set Device Time
Use current time on the PC and set it on LOG-1.
⑥Close
Exit the Utility.
⑦Settings
Change the destination folder of saved data.
*Existing data is not automatically moved if you change the folder.
*XON LOG-1 Overlay Movie Exporter will need to search the specified LOG-1 data folder.
⑧Help
Displays the online manual / version information.
The online manual will open in a browser window.
*To view the PC must be connected to the Internet.
⑨Device display
View the connected device name.
[Short Device Name]([Serial Number])
Example: Device1 (XXXXXXXX-XXXX-XXXXXXXX)
| Short Device Name |
“Device + number” the numeric part is calculated as each device connected to the PC. |
| Serial Number |
The device serial number set at the factory (20 digits). |
Sensor Options
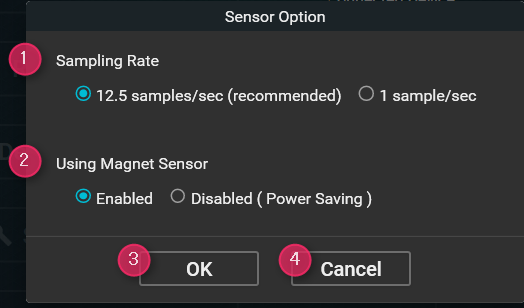
①Sampling Rate
|
|
Total recordable time |
12.5 samples / sec
(80ms interval) |
Recommend for video data overlay. |
About 19 hours |
1 sample / sec.
(1000ms interval) |
Recommend for text file viewing. |
About 240 hours |
② Use Magnet Sensor
If you disable the magnet sensor, you will not be able to retrieve some data (approach, rotation speed, counter).
Power consumption will decrease a little if you do not use the magnet sensor.
(For more information about the battery consumption time, please refer to LOG-1 specifications.)
③OK
Save the configuration changes and close the window.
④Cancel
Close the window without saving the configuration changes.
